Thursday, August 28, 2014

Almond Milk

I would never bash milk, not in 100 years. As a young girl, whenever I would sleep over at my girlfriends house, her parents would buy an extra gallon just because I was coming to stay. Milk for breakfast, milk for lunch, milk for dinner and milk before bed. I loved it and I still do.

That being said, my brain tells me that making my own beverage from something grown from the earth might be a bit more natural for my body. I mean, calves don't breast feed from humans, right?

This post isn't to argue cows milk vs almond milk- I enjoy both. It's simply that I made some fabulous almond milk last night and wanted to share it with you.

The first time I had almond milk it was a store bought container, but then found out how easy it is to make at home with just two ingredients. Almonds + Water.

 
I like very almondy (is that a word?) milk with a dash of cinammon and, if it's around the holidays, a dash of nutmeg, a splash of kahlua and maybe a little...oops, getting carried away. Anyway, this is how I make almond milk using one heaping cup of almonds per three cups of water.
 
The first thing to do is soak the almonds so they get plump and soft. To do this, stick the almonds in a bowl and add water until they are covered by and inch or two, then stash them in the refrigerator for a day. When you get them out the next day don't be alarmed if the water is murky, just drain and rinse the almonds.
 
From there, drop the almonds into a blender and add your water. I like to add just a couple cups of water to begin with, then blend on high for about a minute until its very creamy, then I add the remaining water and continue to blend for another minute or two.
 
Don't start drinking yet, place your nut milk bag into a large bowl, then pour the contents of the blender into the bag. Most of the milk will filter through no problem, but for the rest you'll have to squeeze. Maybe that's where the whole milking an almond thing comes from- squeezing the nut bag. That doesn't sound right.
 
Anywhoo, pour your almond milk into a mason jar and add a couple sprinkles of cinnamon, shake and enjoy! I love having a little mason jar in my fridge full of cinammon almond milk. I'm the only one in the house that likes it, so I can take a couple swigs straight from the jar, pop the top back on and put it away. Yummm yumm.


Tips:
 
The more almonds that you use, plus longer soaking time = creamier milk. 
 
Some people opt to use almonds with the skins removed because the skins can cause a slightly bitter taste in the milk, but I personally can't tell much of a difference.
 
You can add some sweetness or flavor by using vanilla beans, honey, cocoa, sea salt- sky's the limit!
 
What's left in the bag is called almond pulp. There are lots of baked goods recipes that utilize almond pulp, almond meal and almond flour.   
 
Stores 3-4 days
 

Wednesday, August 27, 2014

Kitchen Shelving Inspiration

As a self imposed rule, we aren't allowed to start any more house projects until after the honeymoon. There's no reason we can't look around the web for a little inspiration though, right? 


BHG

I like that these shelves actually wrap around the corner, then we wouldn't have all of that wasted space on the back wall.


Shanty-2-Chic

Shanty-to-Chic uses decorative hooks to make it look as though they are holding the shelves suspended.


BHG

Another idea is to leave a little extra space between the window and the shelves to hang a couple little cafe curtains, but I really love all the light from the windows and would be quite hesitant to block any of it.


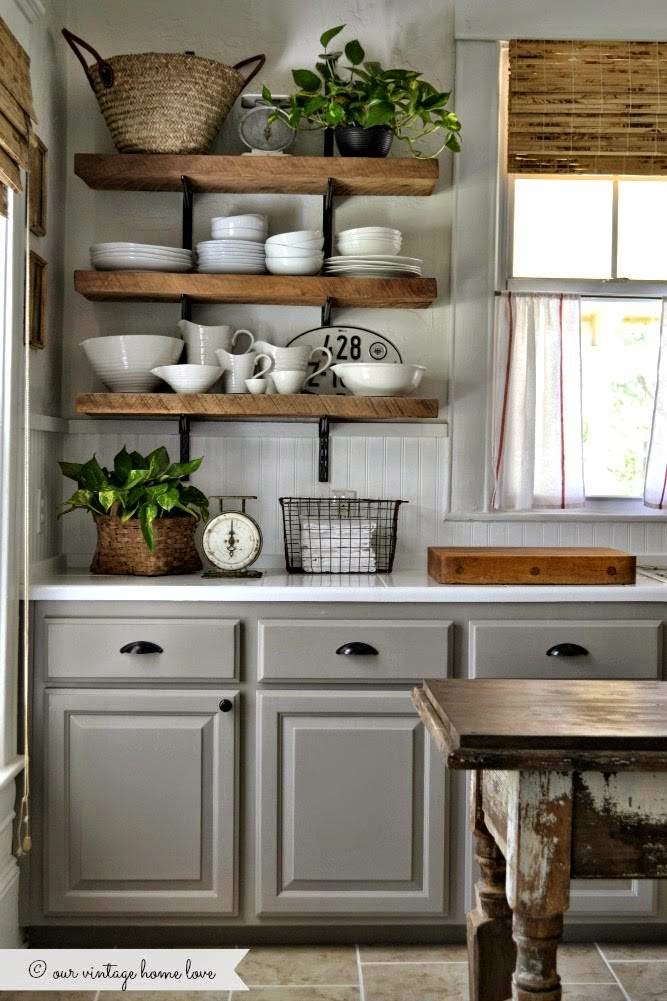
Our Vintage Home Love

Love the decor on Diana's shelves, how she mixes the textures of stoneware, woven baskets, the old vintage scales and greenery.

I'm itching to tear out some cabinets!


Monday, August 25, 2014

Recipe Round-Up

There's not much better than a Sunday afternoon nap, especially being woken by an amazingly scrumptious aroma wafting from the kitchen.

Kelly had gone Salmon fishing on Lake Michigan with his stepdad Sunday morning, so what I was smelling was fresh caught salmon baking in the oven and chopped veggies from the garden being steamed.  I couldn't believe my eyes, nose or mouth. See, this was the first dinner he'd ever cooked for me and it was to-die-for yummy. Well, let me tell you, it's going to have to happen a little more often.

Since our fridge is bursting with fresh salmon, I searched some of my favorite food blogs for a few recipes.


Skinnytaste


Here's a recipe for Naked Salmon Burgers using red and yellow bell peppers. I don't think I'd leave them naked, probably dress them with a little of her Zesty Avocado Cilantro Dressing and stick on a toasted pretzel bun. Yummmm.


Design Love Fest


Spicy and sweet Salmon Tacos with Mango Salsa. She uses chili powder as the fish seasoning, but I think I'd switch it up for cajun and maybe a dash of cayenne pepper.


Wait Til Your Father Gets Home


This one is a little nostalgic...our sitter's family had a cabin on Trout Lake in the U.P. Whenever we'd travel up there to stay, we would stop at this little convenient store to purchase some of their smoked salmon dip. With a box of Wheat Thins, we would have the container of dip devoured before we even made it to the cabin. This Smoked Salmon Dip recipe looks like it might just take me back.


Dinner a Love Story


This Salmon Salad might be on the menu for tonight. Potatoes, corn, green beans, cucumbers....yum.Yes. Definitely on the menu tonight.


Do you know of any good Salmon recipes?

Friday, August 22, 2014

Blast from the Past


I have been volunteering for programs that offer equine-assisted activities and therapies since 2007. Fall of 2013, I found a center close to home that offers classes year round. After a few months of weekly classes here, I decided that I'd like to become certified a therapeutic riding instructor. My mentor suggested that I start taking riding lessons as part of the process.

After searching a few different places for lessons, I came across 'Winning Edge Training Center' in Hudsonville. This perked me up a bit because, when I was little, the barn and trainer that I started riding with were in Hudsonville. I clicked on the link for the website and was looking at pictures of the facility and thought, oh my goodness- that is my old barn! As I'm clicking further along, I find that it's my old trainer as well!

I picked up the phone to call her and I think about gave her a heart attack when I told her who was calling. I starting riding with her when I was a little girl until about age thirteen. It turns out that she had been here and there training and just came back to the old barn in 2013. Is that fate or is that fate?  Now she's married with a sweetheart of a daughter and a young son.

Needless to say, I started taking lessons from her again. I dug around and found one of the scrapbooks that I made years ago, these pictures take us back thirteen years to some of the best days of my life.


This old beauty is Classy Patches, one of the sweetest mares known to this world. I would ride her all around the show grounds with just her halter and lead rope.


This handsome fella is Dyamond in the Rough...aka 'Monty'.  The picture on the left is from the same barn we all came back to. Crazy how the world works. 


Can you tell I didn't like him much? 

Let's go back to this spring...

Tuesday, August 19, 2014

Kitchen Project {Part Three}

It's been a long time coming, but I finally have some new photos! Here are some links if you missed phase one or phase two.


We first framed in the top beam, then installed the bar top with wood glue and finishing nails.  The two sides were completed last so that the bar top is sandwiched between the side beams and the counter tops, adding to stabilization. The whole project was stained, but we put a coat of polyurethane on the bar top to protect from wear and tear of everyday use.


We did make a little mistake with the first varnish we used on the bar top. For our first try, we used boiled linseed oil, which was recommended online and from the local hardware store. We applied the varnish correctly, but it ended up bringing out all of the little imperfections underneath the stain. It's a beautiful varnish, but maybe for something that hasn't been stained. Or maybe we only thought we applied it correctly. Who knows. Anywhoo, we had to completely re-sand and re-stain the board before applying the correct varnish.


He then used Minwax Wood Putty in Ebony to hide the small holes left by the finishing nails. Wood putty vs. wood filler is appropriate to use in this instance as we are unable to sand the final project. It was fairly simple to use- simply form a small ball of putty and rub it into the nail hole. From there, make sure to clean off the surrounding area with a clean, dry rag.


I wasn't much help but an extra pair of hands, but honey did a fabulous job. I knew it was going to look good, but it turned out even better than expected and we both love it. We love it so much that we decided that the rest of the kitchen might like a little bit of a face lift too.

Wouldn't want anyone to get bored around here- right?


GIF


So here's what we're thinking next...
Related Posts Plugin for WordPress, Blogger...